LCD Vehicle Info [.NET/Arduino] (OUTDATED) 0.3.1

")
![PedShootMiniGame [.NET]](https://img.gta5-mods.com/q75-w500-h333-cfill/images/pedshootminigame/cf6ed4-Screenshot_2.png "PedShootMiniGame [.NET]")
![Vehicle Detector [.NET] (OUTDATED)](https://img.gta5-mods.com/q75-w500-h333-cfill/images/vehicle-detector-for-lspdfr-net/bb6f5a-Screenshot_3.png "Vehicle Detector [.NET] (OUTDATED)")

.png)

638
42
638
42
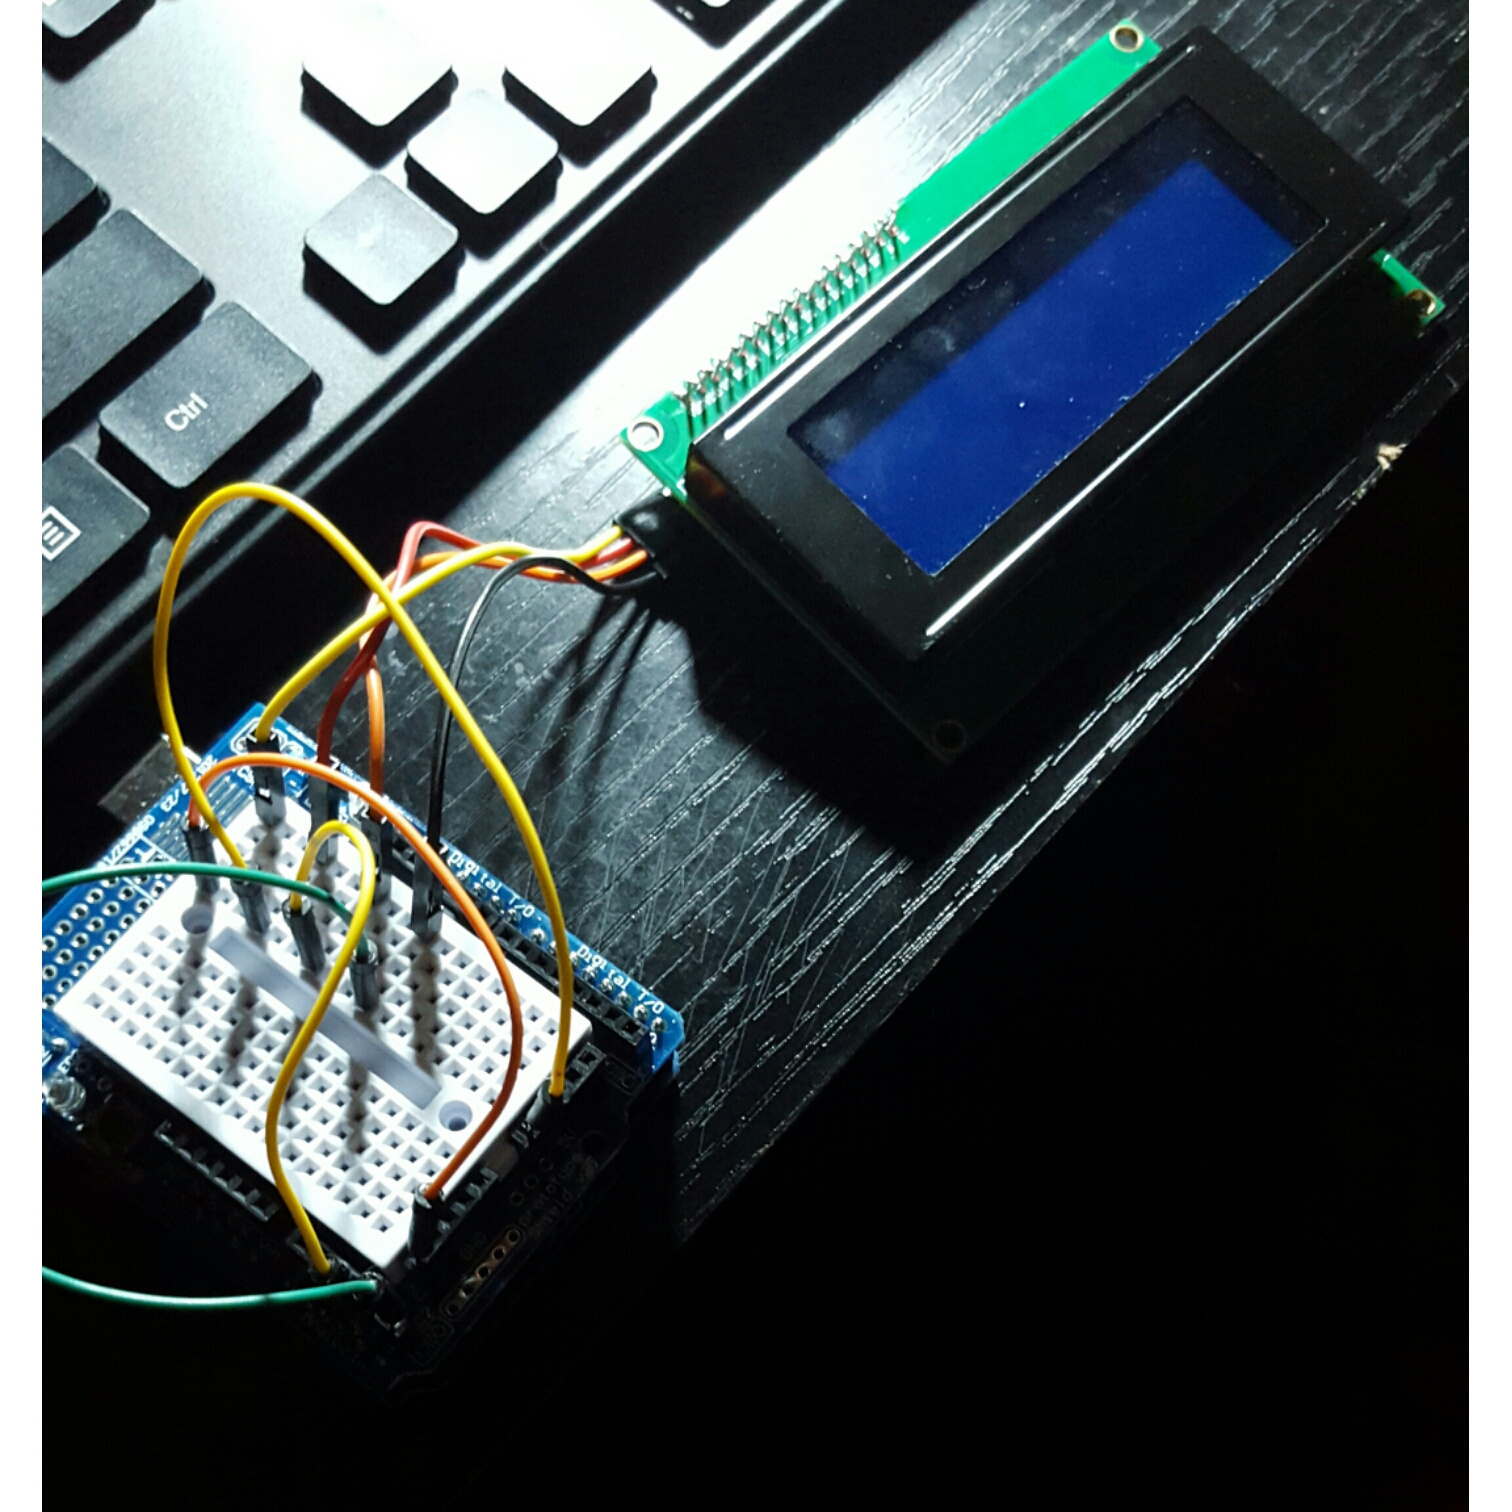
LCD Vehicle Info (for Arduino) v0.3
Speed Only for now, more being added later!
Requirements:
- ScriptHookV
- ScriptHookVDotNet (v2.4)
- Arduino (UNO,Nano,MEGA,Due,etc)
- Arduino IDE
- LCD Screen (I2C or Regular)
How to Use:
Default Keys
Toggle: L
Show Available Ports: O
Changelog
-v0.1: Test/alpha (not released)
-v0.2: First release
-v0.3: Added current vehicle to the LCD screen.
-v0.3.1: Added 2 values in INI (LCDColumn, LCDRow), please make sure to set to your LCD's dimensions!!!
More Info on Arduino: www.arduino.cc
Enjoy!
Speed Only for now, more being added later!
Requirements:
- ScriptHookV
- ScriptHookVDotNet (v2.4)
- Arduino (UNO,Nano,MEGA,Due,etc)
- Arduino IDE
- LCD Screen (I2C or Regular)
How to Use:
- First hookup the LCD to your Arduino then upload the Arduino sketch to your Arduino
- Simply open the .ino in the Arduino IDE
- Select your arduino in Tools -> Port
- I2C:
- Connect the headers to the pins specified in the code (I2C VCC -> 5v, I2C GND -> GND, I2C SDA -> A4, I2C SCL -> A5)
- Verify & Upload
- Regular / Self Soldered
- Connect headers to pins (in order): 12, 11, 5, 4, 3, 2
- Comment out "LiquidCrystal_I2C lcd(0x3F, 2, 1, 0, 4, 5, 6, 7, 3, POSITIVE); "
- Remove "//" comment: "LiquidCrystal lcd(12, 11, 5, 4, 3, 2);"
- Verify & Upload
- Be sure to change lcd.begin(20, 4); to your LCD dimensions! Also, in the INI please make sure to set to your LCD's dimensions!!!
(i.e 16x2 LCD -> lcd.begin(16,2);) - Next, place ArduinoLCD.dll & LCDVehicle.ini in GTAV/scripts/
- Edit "COMPort" in LCDVehicle.ini to the correct Arduino COMPort
- Set BAUD to 9600 (unless changed in .ino)
- If you are unsure about your COMPort, enable "ShowAvailablePorts", go in game and press the specified key for "ShowAvailablePortsKey"
- Open GTA V & Use!
Default Keys
Toggle: L
Show Available Ports: O
Changelog
-v0.1: Test/alpha (not released)
-v0.2: First release
-v0.3: Added current vehicle to the LCD screen.
-v0.3.1: Added 2 values in INI (LCDColumn, LCDRow), please make sure to set to your LCD's dimensions!!!
More Info on Arduino: www.arduino.cc
Enjoy!
최초 업로드: 2016년 01월 09일 (토)
마지막 업로드: 2016년 01월 10일 (일)
마지막 다운로드: 4일 전
댓글 29
More mods by FIFASam:
.png "Multi Waypoint Mod")
- .Net
5.0
2,561
63
1.0.2
By FIFASam
LCD Vehicle Info (for Arduino) v0.3
Speed Only for now, more being added later!
Requirements:
- ScriptHookV
- ScriptHookVDotNet (v2.4)
- Arduino (UNO,Nano,MEGA,Due,etc)
- Arduino IDE
- LCD Screen (I2C or Regular)
How to Use:
Default Keys
Toggle: L
Show Available Ports: O
Changelog
-v0.1: Test/alpha (not released)
-v0.2: First release
-v0.3: Added current vehicle to the LCD screen.
-v0.3.1: Added 2 values in INI (LCDColumn, LCDRow), please make sure to set to your LCD's dimensions!!!
More Info on Arduino: www.arduino.cc
Enjoy!
Speed Only for now, more being added later!
Requirements:
- ScriptHookV
- ScriptHookVDotNet (v2.4)
- Arduino (UNO,Nano,MEGA,Due,etc)
- Arduino IDE
- LCD Screen (I2C or Regular)
How to Use:
- First hookup the LCD to your Arduino then upload the Arduino sketch to your Arduino
- Simply open the .ino in the Arduino IDE
- Select your arduino in Tools -> Port
- I2C:
- Connect the headers to the pins specified in the code (I2C VCC -> 5v, I2C GND -> GND, I2C SDA -> A4, I2C SCL -> A5)
- Verify & Upload
- Regular / Self Soldered
- Connect headers to pins (in order): 12, 11, 5, 4, 3, 2
- Comment out "LiquidCrystal_I2C lcd(0x3F, 2, 1, 0, 4, 5, 6, 7, 3, POSITIVE); "
- Remove "//" comment: "LiquidCrystal lcd(12, 11, 5, 4, 3, 2);"
- Verify & Upload
- Be sure to change lcd.begin(20, 4); to your LCD dimensions! Also, in the INI please make sure to set to your LCD's dimensions!!!
(i.e 16x2 LCD -> lcd.begin(16,2);) - Next, place ArduinoLCD.dll & LCDVehicle.ini in GTAV/scripts/
- Edit "COMPort" in LCDVehicle.ini to the correct Arduino COMPort
- Set BAUD to 9600 (unless changed in .ino)
- If you are unsure about your COMPort, enable "ShowAvailablePorts", go in game and press the specified key for "ShowAvailablePortsKey"
- Open GTA V & Use!
Default Keys
Toggle: L
Show Available Ports: O
Changelog
-v0.1: Test/alpha (not released)
-v0.2: First release
-v0.3: Added current vehicle to the LCD screen.
-v0.3.1: Added 2 values in INI (LCDColumn, LCDRow), please make sure to set to your LCD's dimensions!!!
More Info on Arduino: www.arduino.cc
Enjoy!
최초 업로드: 2016년 01월 09일 (토)
마지막 업로드: 2016년 01월 10일 (일)
마지막 다운로드: 4일 전
 5mods on Discord
I have a greddy RPM, can you help me?
@ZyDevs My LCD is different from yours (my dimensions are 16x2) and now v0.3 is putting too much text on the screen: http://imgur.com/dznwFaa so it pushes the speedometer off and only shows the vehicle name. Do you know if the fix is something I can edit in the .ino file? Or does the way the .NET script writes the string need to be changed?
@rappo Ah, it's the .NET script. I'll release v0.3.1 asap.
This is cool as hell
@Blackout Thanks :D
@Blackout Hell isn't cool. It's hot as hell.
@ZyDevs
I really like your stuff. 5*
You can have my gear estimation code, if you want to.
@LeFix I think that'd be nice for this mod. Contact me on skype: zy.co.sha.dy
I'll give you credits if I use.
If you're into Arduino, don't forget to check out Enums mod from awhile back, great stuff: https://www.gta5-mods.com/scripts/gta-v-arduino-xserial
@MAFINS lol, nice one :)
@ZyDevs I would really use this.... if I only had a Arduino. Kinda hard to get in Pakistan. But you'll still get 5 stars ;)
@GTAVModder4Life Thanks!
A lot of ebay sellers ship worldwide, you could look into it!
@ZyDevs But still, not reliable as you can't get a refund. Many frauds on Ebay, you know.
can someone get it to work with logitech 510s
@rasmusoeh ummmm, this is for the arduino.
قطااااااااااااف
Could you make this work for a Logitech G510?
@GTAVModder4Life - aside from the fact you can buy Arduino boards and far better value 'starter' kits from China etc (copy boards) as mentioned via eBay - remember that the whole Arduino thing is open-source, Arduino is just a dev board system with a bootloader code base preprogrammed into the onboard ATMega microcontroller (of which direct programming code reference is freely available) and an IDE/Compiler combo making it a quick-start way of developing microcontroller projects.
The PCB designs and bootloader code for the various official boards and copies (remember, most copies are just that) are all open-source/PD so you could easily, if necessary, purchase a preprogrammed m/c and make a PCB and solder in the chip socket and ancillaries - but the copy boards kinda make that redundant, but once you've developed a project and got it working to your satisfaction, you can make a simplified m/c board and use an ardunio board as an inline-programmer and have a much more slimmer finished board with integrated switches/controls/display than a deve board and jumper wires and display/switches on a breadboard.
There are specialised/focus variants such as the XinoRF which is a radio enabled UNO R3 derivative, so there are options for different needs and project complexity (UNO type boards are the good middle ground for most beginner/intermediate level stuff), and there are 'duino piggy back boards that use a Pi as the dev station and interface if you already have access to a Pi, and also cheap if you want a flexible multi-mode dev board, are 'duino emulated boards such as Intel Edison/Gallieo or the pcDunio series - which are, like a PI, linux based SBC's with a software emulation of an Ardunio bootloader, linux IDE/Compiler and an integrated breakout that emulates i/o functionality of an actual Ardunio original or pattern/copy board.
So there's always a way to do it that don't break the bank to play with :)
@9h457l33j03k3rr First of all, there is no way to get ANYTHING that you said in pakistan. There's no Ebay, Amazon or Paypal here. Those jumper cables and everything you mentioned CANNOT be obtained within pakistan. Thats what I said. Don't get me wrong I would LOVE to make something with those PCB boards(been following some tuts without even having them lol) but it just can't happen here. Hope you get my point.
@GTAModder4Life - Not really, being old enough to remember when getting hold of parts from Eastern Bloc countries for soviet built kit was a technical no-go, and Far East sourced kit was only 'cheapish' if you were best mates or related to someone in the import/export and wholesale world and yet - we managed it by legal means without having to pay a price premium (mind you, it probably contributed no end towards the early onset of grey hair and a few irrational phobias). It's as much about your inventiveness, your ability to figure out what you can substitute and what may already exist that can be scavenged from existing scrap or sacrificial kit.
Oh yeah, and don't forget, most of the world never had access to Amazon, EBay and fast 'online' payment methods either back then - hell, most of the world didn't have reliable unaffordable (in practise) data comms outside of industry. So that argument as a 'cant do it' doesn't hold any water what so ever.
For sure, if you can obtain or get computer equipment or microprocessor-based kit into Pakistan, which you clearly can else you'd not be able to post here - there's a means to get a microcontroller chip into the country and after that, every else (even if you can't scavenge a microcontroller or PIC chip or find a suitable PLC to implement instead of an Arduino board for a project) is pretty much sourceable by scavenger and sacrificial kit means.
The Ham Radio world, which does exist in Pakistan too, along with a lot of the less affluent areas of hobby electronics and for more specialist projects where specialist resources aren't readily available, has been built on scavenged parts and inventiveness.
My first serious radio project, a prototype digital radio repeater (back in the days before communications in digital multiplexed form was common place) would never have come close to happening if it hadn't been possible to scavenge and rework existing scavenged modules, components and being able to scratch build a suitable (but totally non-standard) comms interface between a ZX Spectrum and a rats nest of a repeater control module. It was possible back in 1985, when sources of most imported components and modules were very limited by what was stocking in the UK from few sources, when i did that project, so it's entirely possible to employ the same wisdom and ingenuity to anything today.
Remember, engineering solutions isn't about what you can get 'off the shelf' to suit the task at hand (that's technician grade thinking), but literally about engineering a solution of out what exists, what the potential is for what exists and how you can create the non-existent bits out of the existing stuff, hence 'engineering' rather than merely building a set of building blocks.
So whilst i don't wish to sound unsympathetic, i have to be as i know it's all possible - if you employ the right frame of mind into making it happen. There's a whole world of 'Tony Ifonly' people out there, who have all the best intention but quit because effort is required to get over obstacles, and there are the do'ers who just get on with doing it, in whatever form or rate of piecemeal progress they can - because to them, the best part of the long journey is arriving and having learnt a crap load about yourself and what you were doing along the way.
@ZyDevs Hey dude, I am working on a mod where you can play GTA 5 PC through your phone, with good quality, for free, and I need help with making this mod, Of course I will give you credit with in the description of the mod, and also I think your mods are pretty good and for me, it would take a century to make them mods you've created, if you can you could make a script that optimizes TeamViewer and you could be able to play GTA V through your phone that way,